XCMS Online Usage Instructions
Version 03.03
Revised March 2016
Overview
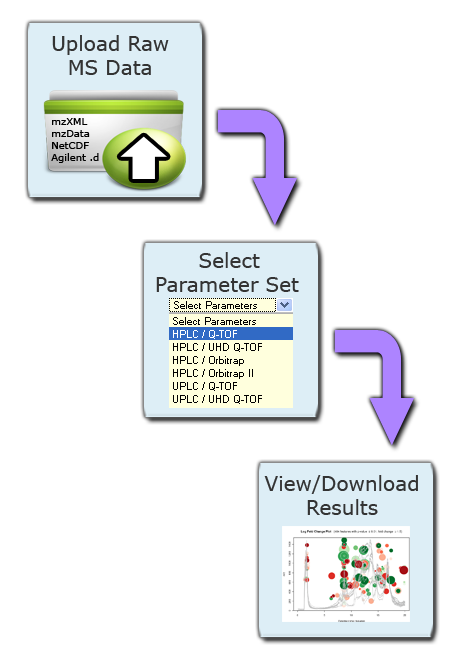
XCMS Online is an innovative platform with an intuitive graphical interface which allows users to easily upload and process LC/MS data for untargeted metabolomics profiling. XCMS Online provides a complete metabolomics workflow including feature detection, retention time correction, alignment, annotation and statistical analysis. To facilitate the usage, predefined parameter sets for different instrument setups (e.g. HPLC/QTOF, UPLC/QTOF, HPLC/Orbitrap) can be selected. Customized settings can be created from these templates. Results can be browsed online in an interactive, customizable table that shows feature statistics, EICs, box plots, and putative METLIN ID’s for each metabolite. All results including the images may also be downloaded as a zip file for offline analysis.
Initially, the platform was developed for two-group comparisons to match the independent, “control” versus “disease” experimental design. It now enables users to perform dependent (paired) two-group comparisons, meta-analysis, and multigroup comparisons, with comprehensive statistical output and interactive visualization tools. Newly incorporated statistical tests cover a wide array of univariate analyses. Multigroup comparison allows for the identification of differentially expressed metabolite features across multiple classes of data while higher order meta-analysis facilitates the identification of shared metabolic patterns across multiple two-group comparisons. Given the complexity of these data sets, we have developed an interactive platform where users can monitor the statistical output of univariate (cloud plots) and multivariate (PCA plots) data analysis in real time by adjusting the threshold and range of various parameters. On the interactive cloud plot, metabolite features can be filtered out by their significance level (p-value), fold change, mass-to-charge ratio, retention time, and intensity. The variation pattern of each feature can be visualized on both extracted-ion chromatograms and box plots. The interactive principal component analysis includes scores, loadings, and scree plots that can be adjusted depending on scaling criteria.
You will need a user account to use the system however user accounts only require a valid e-mail address to register. To process datasets using XCMS Online you will need to create a job which involves uploading the datasets, defining parameters and submitting the job. You will be notified of your job status, including errors/warnings that you can correct prior to resubmitting a job. After processing is complete, you will be notified via e-mail that your results are ready for review.
Creating a User Account
You will initially need to register your e-mail account to be able to use the system. Some configurations may already have user accounts for you or the system may authenticate against a pre-existing database such as Active Directory/LDAP. Check with your system administrator more information. Click "Sign Up" from the top navigation menu then fill out all the fields and click the "Register" button. You will receive an e-mail at the account you entered with validation instructions. Upon validation you will have access to the system. You may then login using the user name and password combination you used to register.
Data Analysis
XCMS Online breaks data analysis up into four categories. Each category uses similar data upload system and generally follows the same step-by-step procedure: choose a job type, upload or choose dataset(s), define parameters, and submit the job. The job types can be broken up into the follow systems, each serving a different purpose:
| Job type | Data classes to upload | Statistics used | Primary research question |
|---|---|---|---|
| Single Job analysis | 1 | NA | What is in my sample? Tell me if there are any class differences |
| Pairwise Job analysis | 2 | T-tests | Are these two classes different? |
| Multigroup analysis | Many | ANOVA or kruskal Wallis | Difference between many groups. Pairwise with QC samples |
| Meta-XCMS jobs | X | X | What is the same between my pairwise jobs? |
All of these data analysis types run peak detection, grouping of peaks across files into features, an alignment of features that have drifted, filling in intensity values from peaks that were missing from samples.
Data Upload Preparation
Before running an experiment you must have data in the proper format. XCMS supports the following datatypes:
- mzXML
- mzData
- mzData.XML
- netCDF
- cdf
- wiff
- wiff.scan
There are two different uploading tools, one written in HTML5 (default) and the other in Java. The Java uploader is now considered a legacy item and will not be supported after May 2016. Also, depending on your security policy you may not be able to use Java through a browser.
NOTE: In addition the the files above, XCMS also supports folders with “.d” extension (Agilent/Bruker). You can upload these folders directly with the Java uploader, but not the HTML5 tool. To upload this data with the HTML5 tool, place the folder contents into a .ZIP archive and upload that file.
To change your default uploader, choose "Account" from the top navigation menu then "User Settings." On the right side under "Uploader Tech" choose HTML5 from the drop-down menu and click the "Save" button.
Uploading Datasets
The first step for running an experiment usually involves uploading data. Choosing Single, Pairwise, or Multigroup from the "Create Job" sub-menu will give you a step-by-step wizard. The fist step is to Select Datasets. Choosing "Load New Dataset" will pop-up a window with the uploader of your choice. When uploading data keep these important points in mind:
- Dataset names must be unique. The upload tool will generate a generic name based on your username and the current date. You can change the name while the data is uploading or after it is complete.
- The upload tool must remain open while data is uploading. If you close the window you must start over. However, you may minimize the window and continue working while data is uploading.
The HTML5 upload tool allows users to drag and drop files into the area labeled "Drop Here." each file has a circular progress indicator. Clicking the icon to the right of the indicator allows you to cancel the upload of or delete that file from the dataset. You can also rename the dataset at this time. When the upload is complete, click the "Save Dataset & Proceed" button at the top of the window.
The Java upload tool may require additional setup depending on your security settings. Appendix I: Java Issues shows a few common dialog boxes you may encounter. If you receive a warning, click “Run” or add an exception for this server. Once the Java applet has permission to run you will see an upload dialog box.
Select files/folders to be included in the dataset from the file tree. Individual files will appear in the file list as you navigate the file tree. After you locate the files for this dataset, drag them to the “Drop Files Here” area located in the lower-right of the screen and they will immediately start compressing (zip compression). Alternatively you can click the “+” symbol to select the files you want to include. You may need to maximize window size or use scroll bars to display all text. A small progress bar will appear under each file as it is zipped. You may need to wait until zipping finishes before clicking the "Upload" button. When you have included all the necessary files, press the Upload button and move on the the next step.
Pairwise Job Creation
The most common experimental design in metabolomics is two-group analysis, where “disease” and “control” or “before” and “after” treatment groups are compared. Even in a simple two-group experiment, choosing the right statistical test may be a challenging task for users without a background in the field of biostatistics. Depending on data distribution and experimental design, XCMS Online offers the choice of parametric or nonparametric, independent (unpaired) or dependent (paired) two-group tests. In general, two-group tests allow users to determine the metabolite features whose levels are significantly different between two defined conditions.
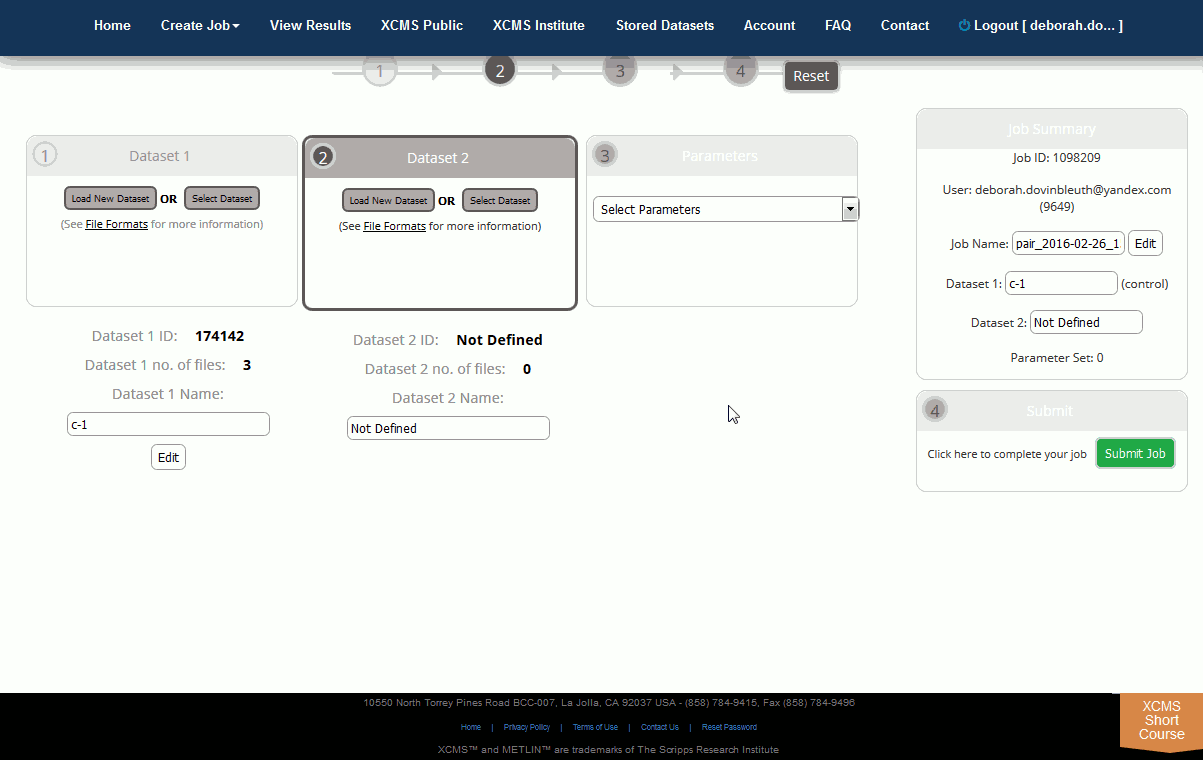
Step 1: Create a Job. Click on “Create Job” in the top navigation menu. If you do not select an experiment type, the system defaults to pairwise.
Step 2: Upload the Datasets. The create job page will open for you to define the job. There is a step navigation wizard directly below the top navigation bar that will serve as a guide. Upon initial load, a default job name will be created based on your user name and the current date. Clicking the job name allows you to edit it.
Initially you will need to upload a dataset. Dataset 1 is often defined as the control data set in pairwise jobs (left-hand side). After this is completed you can begin the second dataset upload. The Dataset 2 section can be found to the right of the Dataset 1 section. Remember, you must have unique names for each dataset even if the ID is different. You can modify the dataset names after an upload has started by clicking the “Edit” button to the right of the respective dataset name.
Step 3: Select Parameter Set. After uploads are defined you must define the corresponding job parameters. This can be done while uploads are still in progress. For your convenience XCMX Online offers predefined parameter set templates (e.g. HPLC/TOF, UPLC/TOF, HPLC/OrbiTrap). Simply select one and customize it to your particular needs. Click on the Parameter drop down box to begin defining parameters. After you select a template, the dropdown will change and you will be able to view or edit the selected parameter set.
Step 4: Define Custom Parameters. Skip this step if you do not wish to define custom parameters. Select the “View/Edit” button. This will present a modal dialog box where you can define how the datasets are processed. Methods and properties are available for all aspects of dataset processing.
If you choose to change any of the settings in a template parameter set, you will need to create a new parameter name for processing otherwise your changes will not be saved. You cannot overwrite a template parameter set. The name for a custom parameter set can be set in the “General” tab.
Step 5: Submit the Job. At this point you can review all relevant details about the job prior to submission (e.g. job name, dataset names, correct file count, correct parameters). Once you are satisfied, click the “Submit Job” button to queue the job for processing. The “Submit Job” button can be found at the bottom of the screen. Even if you still have datasets uploading you can pre-submit the job and it will automatically queue once the upload is complete.
After you click “Submit Job”, you will have a final opportunity to view all settings for the job prior to submission. A modal dialog box will appear on your screen displaying job settings. Carefully review the information as this cannot be changed after submission (You would need to create a new job, although your data sets will already be stored). If you are satisfied with the displayed information, click the “Submit Job” button in the lower-right corner of the dialog box, otherwise click cancel and make the necessary changes.
It is important to not close the browser if you have uploads in progress as these will cancel. There is a timer on the page that will automatically redirect the entire page to the “View Results” section when all uploads are complete. XCMS Online will notify you when your job has successfully queued.
Single Job Creation
The single job analysis is best suited to the analysis when either the researcher has no known class description for their data. With this analysis there are no univariate statistics so the job does not return p-values for each feature. However, multivariate statistics such as principal component analysis will be available and will help the user decide if any classes/grouping is occurring in the dataset. To do single job analysis perform the following tasks:
Step 1: Create a Job. This will open the interface for the creation of a single job type.
Step 2: Select Dataset(s). Choose either upload data or select an existing dataset. For uploading a new dataset see section 3.2. only one dataset should be uploaded/selected. The dataset can contain many files or just one file.
Step 3: Select Parameters. Select a preset or customized parameter set for processing your job. For details on parameter select please see section 7.0.
Step 4: Submit the Job. Check that the options for the job are as you require and optionally change the name of the job. Finally, if everything looks correct click submit.
Multigroup Job Creation
Multiple group analysis is an extension of two-group analysis that allows the comparison of means for multiple independent groups and enables the identification of metabolite features whose variation pattern is statistically significant. To evaluate the metabolite variation across different experimental groups, XCMS Online provides the univariate analysis of variance (one-way ANOVA) as a parametric test option and the Kruskal−Wallis test as its nonparametric alternative. The post-hoc analysis is used to determine which groups significantly differ in their metabolite expression pattern. Multigroup cloud plots display the metabolite features whose level varies significantly across different analyzed groups or data classes.
Step 1: Create a Job. Begin by creating a new multigroup job. Multigroup jobs are initiated by hovering over the “Create Job” in the top navigation menu. If you do not select an experiment type, the system defaults to pairwise. You will notice there is only 1 area for adding datasets (via upload or selection) in the step navigation wizard. As you add datasets, they will show up in a list below the wizard.
Step 2: Define Biological pooled quality control (QC) dataset (OPTIONAL). This optional step allows users to select a biological pooled QC sample. This biological pooled QC currently removes this sample class from the statistical evaluation. However, the EIC and box plots of this class will still be included.
Step 3: Select Parameter Set. After uploads are defined you must define the corresponding job parameters. This can be done while uploads are still in progress. For your convenience XCMS Online offers predefined parameter set templates (e.g. HPLC/TOF, UPLC/TOF, HPLC/OrbiTrap). You can simply select one of those predefined parameter sets or customize them to your particular needs. To begin defining parameters, click on the Parameter drop down box. After you select a template, the drop-down will change and you will be able to view or edit the selected parameter set. The main difference between default multigroup and default pairwise parameter sets is the statistical tests performed (See statistics tab of parameter set for details).
Step 4: Submit the Job. At this point you can review all relevant details about the job prior to submission (e.g. job name, dataset names, correct file count, correct parameters). Once you are satisfied, click the “Submit Job” button to queue the job for processing. The “Submit Job” button can be found at the bottom-right of the screen, similar to pairwise job work-flow.
metaXCMS Job Creation
Metabolomic studies can reveal hundreds of dysregulated metabolic features, even using stringent statistical criteria. Meta-XCMS can be especially useful for untargeted metabolomic studies, where multiple pairwise jobs were performed and different biological sources are available.
Each meta-XCMS job requires at least two pairwise jobs each with the same control dataset. For example a meta-xcms jobs would contain a pairwise job WT vs KO, a WT vs KO2 and WT vs KO3 where each WT is from the same sample and has the same dataset ID. Once these jobs are finished users can make the meta-XCMS job as follows:
Step 1: Create a Job. You will want to begin by creating a new metaXCMS job. metaXCMS jobs are initiated by hovering over the “Create Job” in the top navigation menu. If you do not select an experiment type, the system defaults to pairwise. You can only add completed pairwise jobs as source inputs for a metaXCMS experiment so there is no uploading involved. Details about each pairwise job will appear in the table below the selection dialog as you add them.
Step 2: Select Parameter Set. Parameters for metaXCMS jobs are defined in step 2 of the wizard (center of screen). There are three (3) tabs for defining fold change, p-value, intensity cutoffs as well as alignment and adduct settings.
Step 3: Submit the Job. When you are satisfied with the parameters for the metaXCMS job, click the “Submit Job” button in the lower-right. Details about each pairwise job will appear in this table.
Results
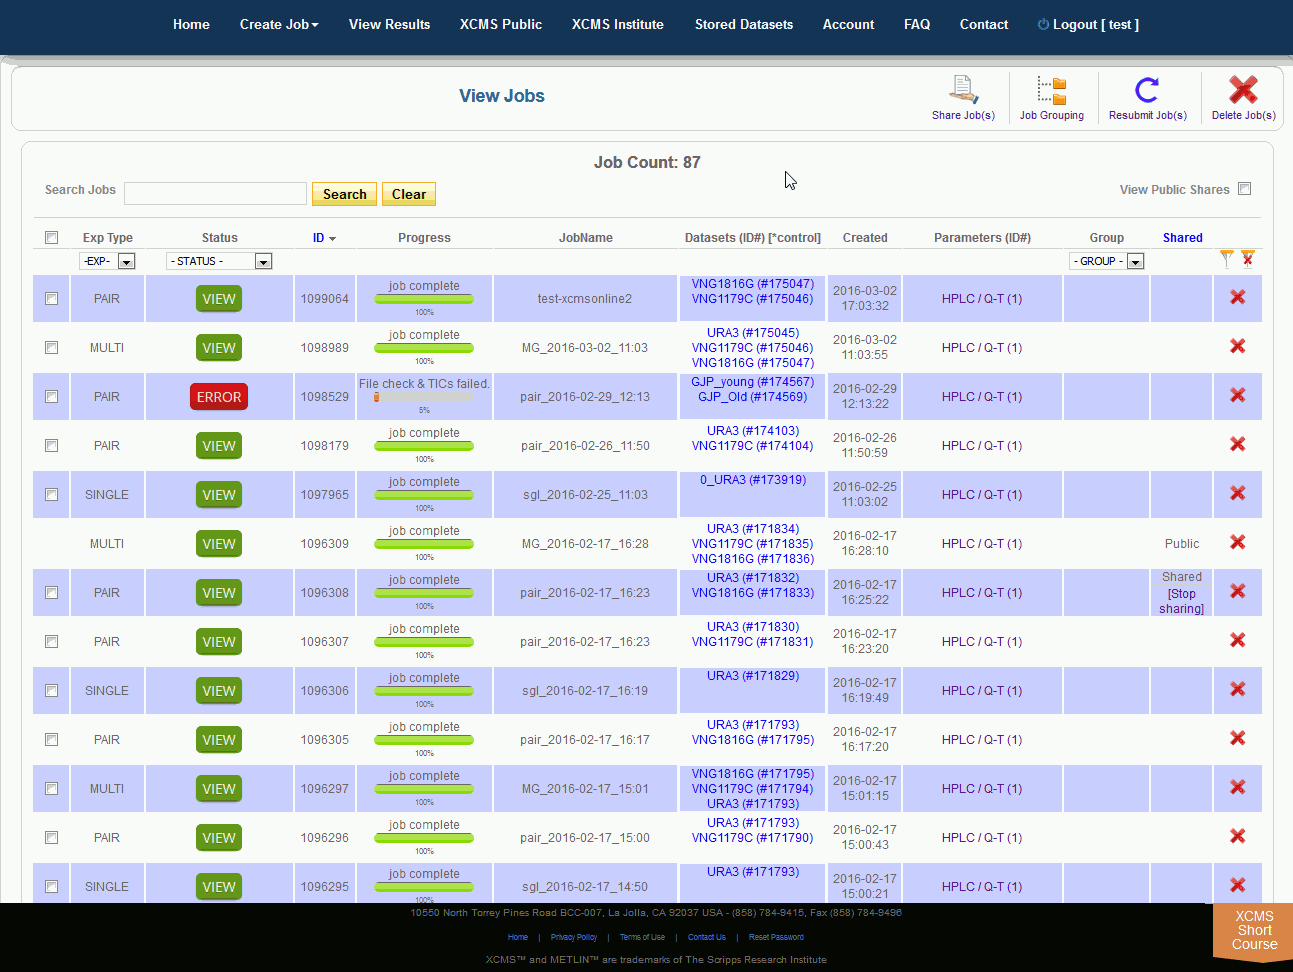
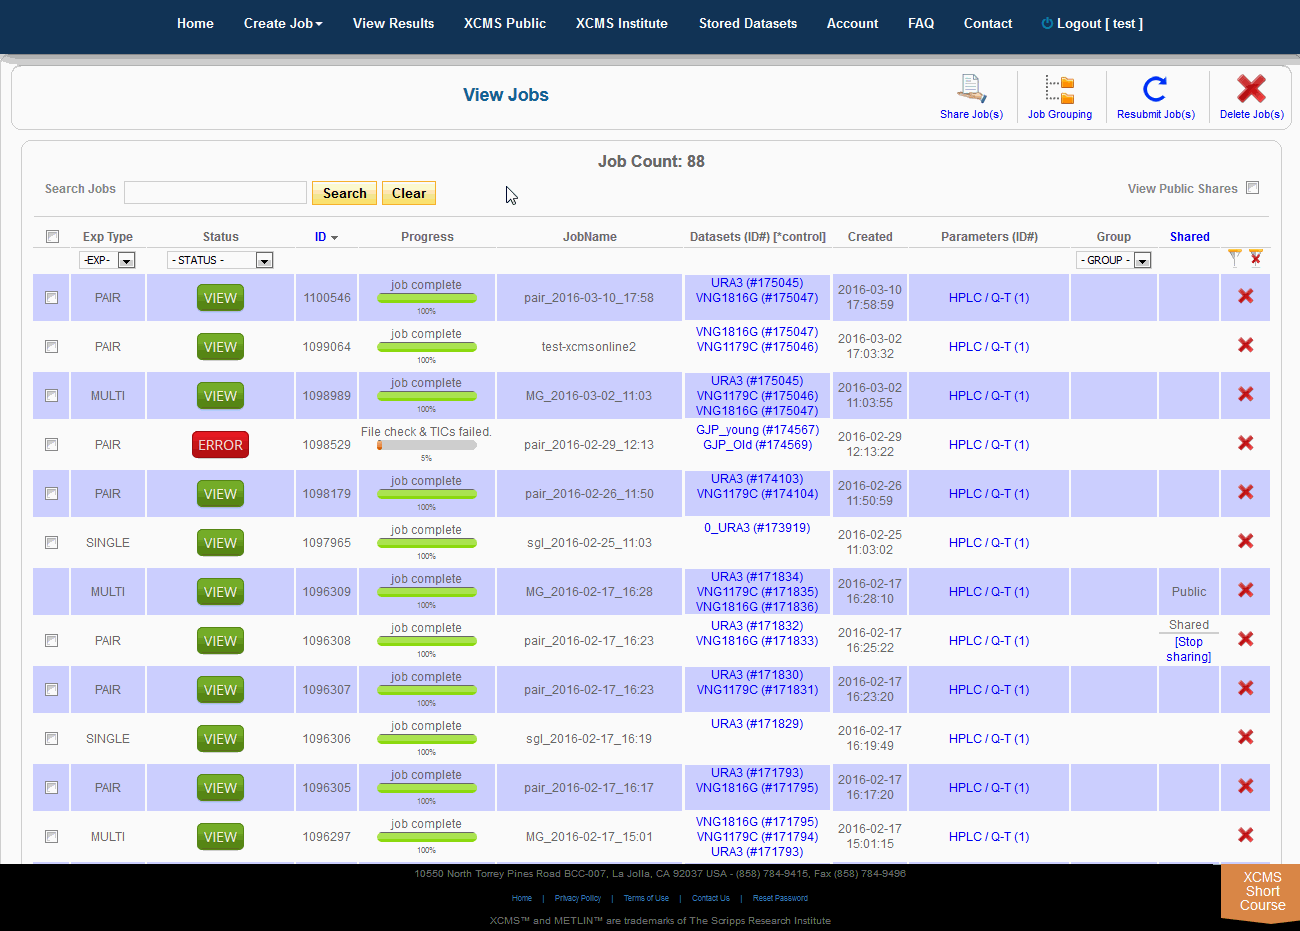
After you submit your job, you will be forwarded to the “View Results” page where you can see details of your submitted jobs including progress percentage, datasets used and parameter set used. The page will automatically refresh if you have pending jobs, however, you will also receive an e-mail when each submitted job is complete. Once complete, you may view the results by clicking the green “VIEW” button. Details about each job will appear. Each experiment type will have similar visualization tools but not all will be applicable to all jobs.
Pairwise Jobs will have an initial results screen that provides a summary with the following graphs:
- Total Ion Chromatograms (TIC) Before retention time alignment
- Retention Time Deviation vs Retention Time
- LTotal Ion Chromatograms (TIC) post retention time correction
- Cloud plot
- Multidimensional Scaling (MDS)
- Principal Component Analysis (PCA)
- Optionally a MS/MS scan location plot if MS/MS data was included in file upload
You can also download the full results as a zip file using the link at the top of the page. This file will not include any online annotations you input in the feature result table.
Multigroup Jobs will have an initial results screen that provides the same plots as the above pairwise job.
Single Jobs will be dependent on how many files are present in the job. For example if many files are in the dataset then a retention time plot will be shown along with the corrected TIC. With multiple files a PCA and MDS plot will be shown. However, with single jobs where only one file is present then only a TIC will be shown.
metaXCMS Jobs will have an initial results screen that provides a Venn diagram of the results along with a link to the View Results Table on left-hand size of page. There are no interactive cloud, interactive heatmap or interactive PCA plots.
Over time you may have a large number of results on this table. Above the table is a search box that searches the columns "ID" and "JobName". Clicking the "ID" header will sort your jobs by ascending or descending order. The XCMS system also has a quick-filter mechanism to help you find data. There is a drop-down menu above the columns Exp Type, Status, and Group. Choose the values you want then click the filter button on the right side of the table. You can clear the filters with the button next to it.

The view results page allows you to delete a job by clicking the button in the far right column. The underlying dataset will not be deleted with a single click, as you may wish to create another job with different parameters and compare results.
View Results Table
The View Results Table is different than the View Results page and can be found by clicking the “VIEW” button of a job. On the left side is a button named "View Results Table." If this is the first time viewing the current job, the data will be loaded into the database for viewing and annotating which may cause a brief delay. Subsequent viewing will be faster. As you navigate through each feature (you can use arrow keys), details about each feature is displayed to the right of the table (m/z, retention time, EIC, box-and-whisker plot and putative METLIN ID’s).
Multigroup jobs will have an additional tab in the Mass-Spectrum/Box-and-Whisker plot section for post-hoc calculations between datasets.
- Searching/filtering is available by clicking the magnifying glass icon lower-left of the table.
- You can hide or display specific columns by clicking the icon in the lower-left.
- Clicking any column header will sort the table in ascending or descending order by that field.
- Column order and width can be configured by dragging and dropping column headers.
- Double clicking a row or pressing “Enter” will open the notes dialog box. This information is saved in notes column.

Interactive Cloud Plot
Click “View Interactive Cloud Plot” button. The interactive cloud plot will display all features as “bubbles” in the right pane while details can be found in the left pane. You can adjust parameters on the left then click “Regenerate Cloud Plot” to see the results. You can see this information in a table by clicking the "Table" button under the plot.
You can print the cloud plot or export it as in image for use in publications by clicking the icons in the upper-right corner of the plot. If you use any of the features or images in XCMS Online as part of a publication, we request you cite the appropriate source publication upon which the technology is based. Please see the Citation Reference section in Appendix II for publication references.
NOTE: Detailed information for the cloud plot feature is available in the "Cloud Plot Manual" button in lower-left of the screen.
Interactive PCA
Click “View Interactive PCA” button to View Interactive Principal Component Analysis. The iPCA feature allows the user to modify the axes, loadings and export the resulting scree, scores or loadings plots.
Interactive Heatmap
Click “View Interactive Heatmap” button to view Interactive Heatmap. The interactive heatmap displays the data in a format that can be analyzed visually based on color but may also be sorted/zoomed to display additional detail about specific features. Detail is displayed when the mouse rolls over the box. Clicking the box will open a separate window where feature number, meta information, graphs (box-whisker, EIC, mass spectrum) and possible METLIN hits are displayed. You may have to permit popup windows in your browser settings for this feature to work correctly.
⏳ TO BE COMPLETED
Connection Report
⏳ TO BE COMPLETED
Downloading Data
Click "View Results" from the top navigation menu then "view" your desired experiment. Click "Download Results" from the upper right corner. This will begin the download of a file named results.zip. Below the button is the word hash: followed by a long string of characters. This is a MD5 checksum value, a cryptographically generated number based on the input file. Think of it as a unique signature for your file. We use MD5 hashing to verify data integrity during transfer. If you want to verify the data has not been corrupted during transfer use a MD5 hash tool to compare the downloaded file with this number.
For Windows users we recommend a tool named WinMD5 Free. (http://winmd5.com/) Download the file named windmd5free.zip and extract the executable named WinMD5.exe. There is no installer, you simply double-click the program to run it.
Once the program is open, click the Browse button and navigate to results.zip or drag the file onto the window. WinMD5 Free will calculate and display the signature. Copy and paste the hash value from the XCMS website into the bottom field and click Verify. WinMD5 will tell you if there is a match.
Account Management
Storage of user data is limited. This includes all uploaded datasets, custom parameters and jobs results (including annotations). To free space for additional uploads, you will likely need to delete jobs and/or datasets. To check your account storage, navigate to the Account menu. The sub navigation menu along the bottom of the main navigation has miscellaneous settings affecting your account such as "Alerts" and "Reporting." The “User Settings” allows you to modify the default theme used for displaying job results. The drop-down preview menu shows representative display.
Adducts
⏳ TO BE COMPLETED
More Features
⏳ TO BE COMPLETED
Dataset Management
Click on “Stored Datasets” in the top navigation bar to access the stored datasets area. This page will list all datasets previously uploaded. From here you may delete the entire dataset by clicking the “X” in the far right column. A confirmation dialog box will appear for you to continue or cancel the operation. To rerun jobs based on deleted data, you will need to re-upload the data; we cannot retrieve deleted datasets.
Dataset Duplication
In addition to deleting, you may duplicate datasets and add files/classes to them. For duplication simply select the datasets you wish to duplicate and select “Duplicate Dataset(s)” in the sub top navigation bar. This will initiate the process, which may take several minutes depending on the underlying hardware capacity and current usage. During the copy, the status will say “COPYING” for the new dataset. Once complete, the status will automatically change to “COPIED” and the new dataset will be available for use in new job types.
Adding Files to Datasets
When there is a need to modify the underlying files/classes in a dataset (i.e., corrupt upload of file or forget to include a class), the user may wish to upload the missing file. If the missing file has the same name as an existing file, the existing file will be replaced with the missing one. If it is a new file the dataset will be updated. To view the files in a specific dataset, find the dataset name on the Stored Datasets page and click the name. On the following page you will find a list of all the classes in this dataset. You can then verify/add comments, check the size and change the dataset. You can add more files to this dataset by clicking the “Add File(s)” button in the sub top navigation bar.
NOTE: Adding files after jobs have already completed will not re-run them. The jobs that rely on modified dataset(s) will need to be re-run manually.
Tree View
XCMS Online allows you to easily create a unique dataset from any combination of existing files using the Tree View. To do this, select "Stored Datasets" from the top navigation menu the click "Tree View" in the upper right sub-menu. All your datasets will be listed in a file explorer on the left side of the screen. You can select whole datasets by clicking the check-box to the left of each name, or select partial data by clicking the triangle to unfold the related files. Once you have selected the desired data, enter an unique name for your new dataset in the "Dataset name" field then click "Create".
Parameter Management
The Parameter Manager can be accessed via the “Parameter Manager” icon next to “User Settings” in the Account sub menu. Here the you can search, review, create and delete your parameter sets. This will not affect previously-processed jobs unless they are re-run. Resubmitted jobs will use the new parameter set(s) for processing.
⏳ TO BE COMPLETED
Job Sharing
The XCMS Online system allow you to share one job or many jobs instantly with a specific user or all users. From the "View Results" page simply click the check-box to the left of the job you want to share, then click "Share Job(s)" in the upper-right. A pop-up screen will appear.
Step 1: Chose how long to share. The default time for a share is three (3) months (unless modified by an administrator). In the field "Results available until" enter the desired expiration date in the format yyyy-mm-dd.
Step 2: Choose who can view the job. There are three options: Share with everyone, share with a previous guest, or create a new guest to share with.
Step 3: Set the permissions. Selecting only the "View" check-box will allow guests to read your data and notes, but they cannot modify it. Selecting the "Edit" check-box allows guests to re-run your job with different parameters and make annotations.
⏳ TO BE COMPLETED
Viewing Public Shares
To view job made public by other users, click "View Results" from the top navigation menu. In the upper-right is a check-box named "View Public Shares." After checking the box the page will refresh and include these jobs in the list. To find them easily, click the column heading "Shared" to sort the list by shared and not-shared jobs.
The Sharing Center
The Sharing Center can be accessed via the “Account” menu in the top navigation bar. Click "Sharing Center". This takes you to a portal where job shares can be viewed, modified and deleted. The page also includes filtering/ordering to see which jobs are scheduled to expire soon. When a job share expires, it will become inaccessible by the guest user, however, the job itself will not be touched. To make the job accessible again the job owner needs to re-share it. Unless otherwise modified by the system administrator the default share period is 3 months.
You can add annotations to public shares by clicking the job name. A window will pop-up with the fields "Publication Journal," "Authors," and "Notes." Make your changes to these fields and click the green "Save" button.
Appendix
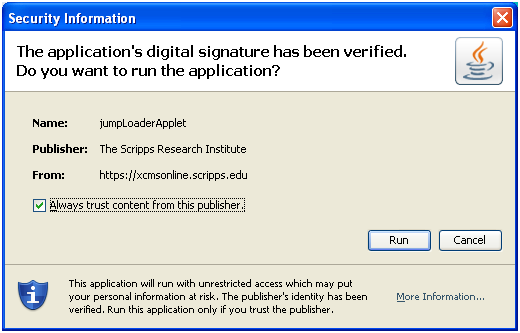
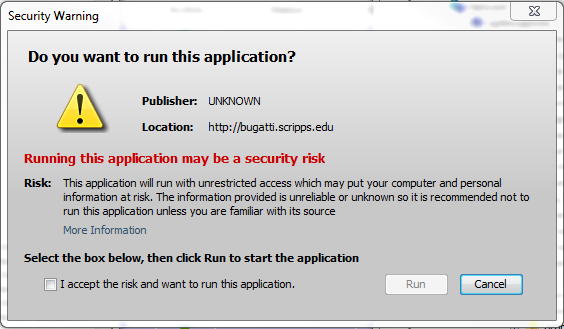
Appendix I: Java Issues
upon running the Java Uploader Applet you may receive a warning. If your security policy allows it, check the box "Always trust content from this publisher" or "I accept the risk and want to run this application" and click "Run."
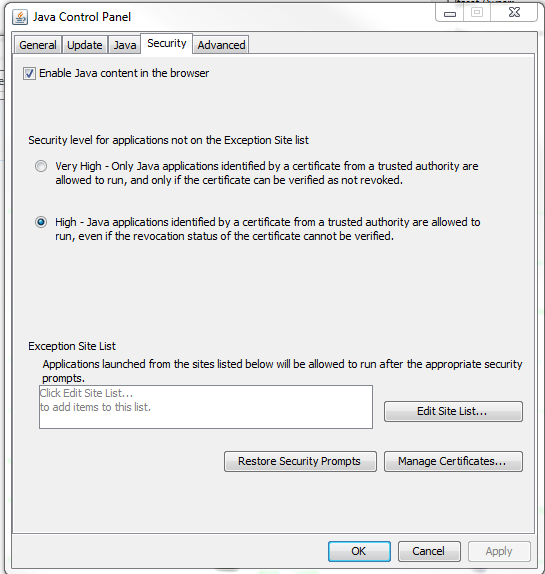
You may also change the security settings in the Java Control Panel. Switch to the Security tab and check "Enable Java content in the browser" then add an exception to the list at the bottom of the dialog box.
Appendix II: Citation Reference
If you use any of the features or images in XCMS Online as part of a publication, we request you cite the appropriate source publication upon which the technology is based.
XCMS Online: A Web-Based Platform to Process Untargeted Metabolomic Data
Ralf Tautenhahn, Gary J. Patti, Duane Rinehart, and Gary Siuzdak
Analytical Chemistry, 2012, 84(11) 5035-5039. PMID: 22533540 PDF
A View from Above: The Cloud Plot for Visualizing Global Metabolomic Data
Patti G.J., Tautenhahn R., Rinehart D., Cho K., Nikolskiy I., Johnson C., Siuzdak G.
Analytical Chemistry, 2013, 85(2), 798-804. PMID: 23206250 PDF
Quadropole-Time-of-Flight Mass Spectrometry Characterization of Metabolites Guided by the METLIN Database
Zhu Z-J., Schultz A.W., Wang J., Johnson C.H., Yannone S.M., Patti G.J., Siuzdak G.
Nature Protocols, 2013, 8, 451-460. PMID: 23391889 PDF
An accelerated workflow for untargeted metabolomics using the METLIN database
Tautenhahn R., Cho K. Y., Uritboonthai W., Zhu Z., Patti G. J., Siuzdak G.
Nature Biotechnology, 2012, 30(9), 826-8. PMID: 22965049 PDF
Metabolomic Data Streaming for Biology-Dependent Data Acquisition
Rinehart D., Johnson C.H., Nguyen T., Ivanisevic J., Benton H.P., Lloyd J., Deutschbauer A., Arkin A., Patti G.J., Siuzdak G.
Nature Biotechnology 2014 32(6) 524-527. PMID: 24911492 PDF
Interactive XCMS Online: Simplifying Data Processing and Statistical Analyses
Gowda H., Ivanisevic J., Johnson C.H., Kurczy M.E., Benton H.P., Rinehart D., Nguyen T., Ray J., Kuehl J., Arevalo B., Westenskow P.D., Wang J., Arkin A.P., Deutshbauer A.M., Patti G.J., Siuzdak G.
Anal. Chem. 2014 86(14) 6931-9. PMID: 24934772 PDF
Autonomous Metabolomics for Rapid Metabolite Identification in Global Profiling
Benton H.P., Ivanisevic J., Mahieu N., Kurczy M., Johnson C., Franco L., Rinehart D., Valentine E., Gowda H., Ubhi K., Tautenhahn R., Gieschen A., Fields M.,Patti G., Siuzdak G.
Anal. Chem. 2014 December 12, 2014. PMID: 25496351 PDF